
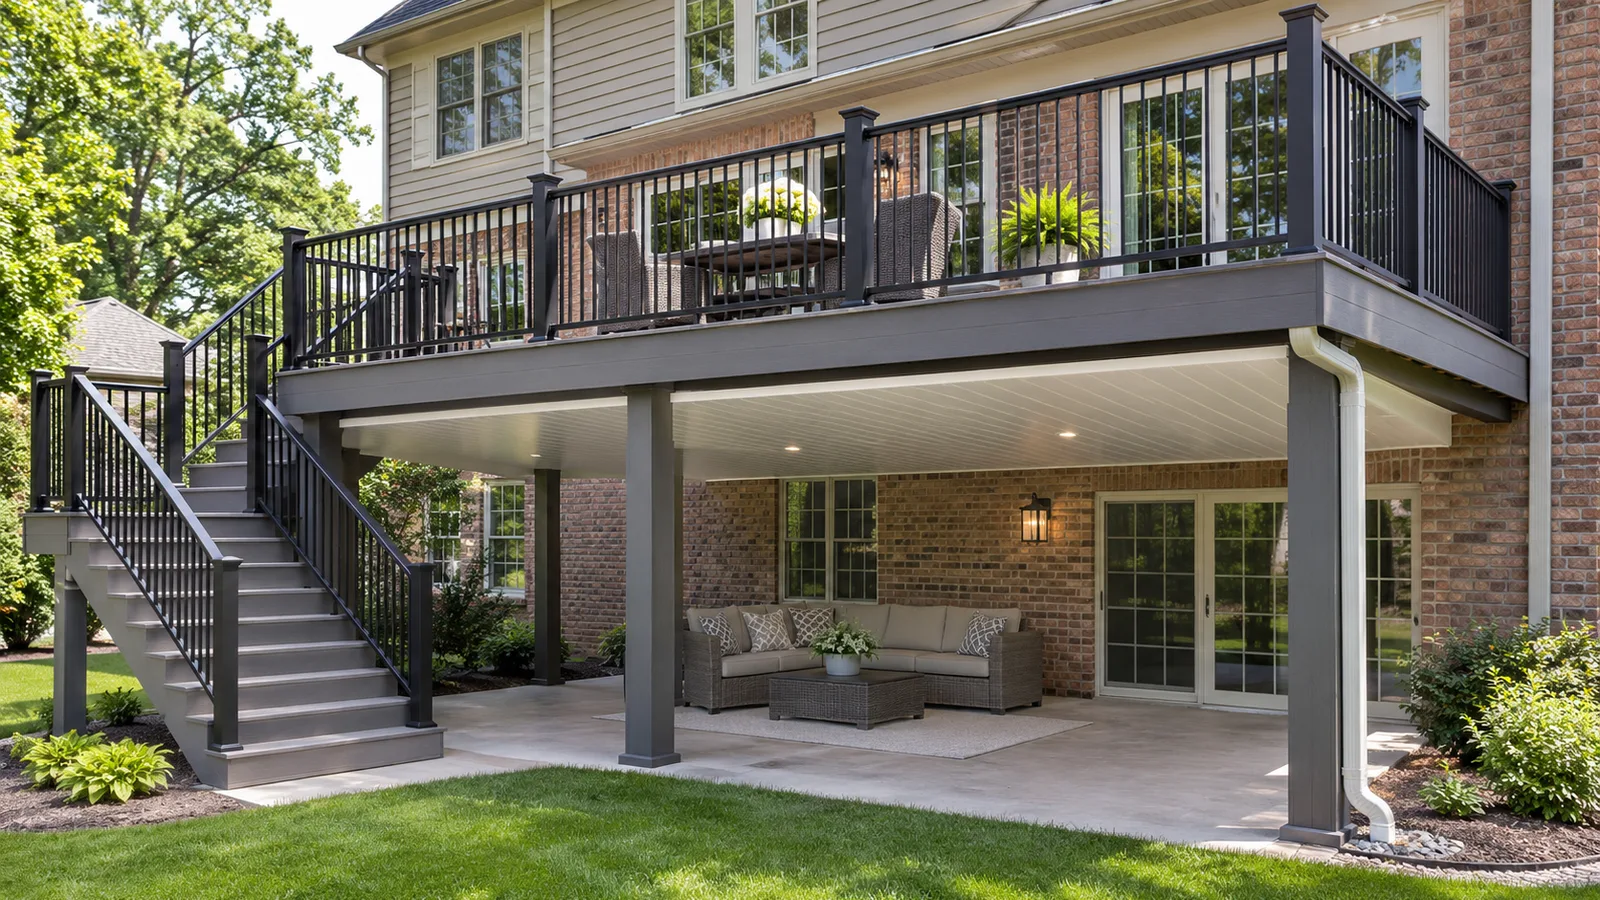
Yes. The area beneath an elevated deck can stay substantially drier when a purpose-built drainage system collects water that falls through the deck-board gaps and carries it to gutters and downspouts. The system may sit above the joists or below them, and that choice affects framing protection, retrofit work, ceiling height, maintenance access, and cost. It does not solve every source of moisture: wind-driven rain can enter from open sides, condensation can form, and poor grading or a badly placed downspout can still wet the patio. Plan the deck, drainage, outlet locations, finished ceiling, lighting, and intended use as one assembly rather than adding decorative panels that have no reliable path for water.
What does an under-deck drainage system actually do?
Deck boards are separated by gaps, so an ordinary elevated deck sheds water onto the framing and patio below. A drainage system gives that water a controlled route. Sloped troughs or ceiling panels collect it, gutters combine the flow, and downspouts carry it to a suitable discharge point. That is different from attaching flat soffit panels beneath the joists and hoping water finds its way out.
The realistic goal is a more usable sheltered patio during normal rain, not an indoor room without walls. Wind-driven rain can enter from the sides. Water can also arrive from an upper railing post, house connection, stair, overflowing gutter, condensate line, or saturated ground. If the lower patio pitches toward the house or a downspout empties beside a door, a polished ceiling alone will not keep the whole space dry.
TimberTech describes DrySpace as a system that collects water passing between deck boards and channels it away. Its current installation guide also says the system is not a waterproof roof and must drain away from the house. Those limits are useful for any product comparison: judge the complete water path and the intended use, not only the finished ceiling appearance.
- Identify where water enters the system and where every bay discharges.
- Account for open sides, stairs, railing penetrations, and the deck-to-house connection.
- Check the patio slab and surrounding grade as well as the ceiling above.
- Keep gutters, outlets, and downspouts accessible for cleaning.
Should drainage go above or below the deck joists?
An above-joist system is installed before the decking. Membrane troughs sit over the joists and direct water toward a gutter, so the water is intercepted before it repeatedly wets the top of the wood framing. This approach is easiest to coordinate on a new deck or during a full resurfacing project when the boards are already being removed.
A below-joist system attaches beneath the framing and collects water after it passes through the deck and around the joists. It can be a practical retrofit because the deck boards may remain in place, and some systems also create the visible ceiling. The tradeoff is that the framing above the panels still gets wet. Debris, ventilation, panel pitch, beam interruptions, and access for inspection therefore matter.
Trex RainEscape's current existing-deck guidance makes the same basic distinction: an over-joist retrofit requires removal of decking and related obstructions, while an undermount system is usually easier to add beneath an existing deck. TimberTech says DrySpace can attach to new or existing deck joists, but its installation guide sets product-specific limits for joist spacing, run length, beams, slope, ventilation, and drainage. Use the current instructions for the exact selected system rather than treating either category as universal.
- New deck: compare above-joist protection before the decking layout is finalized.
- Deck resurfacing: inspect the exposed framing and coordinate drainage before new boards go down.
- Intact existing deck: compare the disruption of removing boards with the framing exposure of an undermount system.
- Long spans or intermediate beams: verify how each drainage run ends and reaches a gutter.
What should be checked on an existing deck first?
Do not conceal a deck that already has unresolved movement, decay, corrosion, poor ledger flashing, failing posts, or standing water. Inspect joists, beams, posts, footings, connections, fasteners, the house attachment, stair framing, and the ground below. Note stains or soft areas that suggest the current water path is already causing trouble. Drainage panels can hide those conditions from everyday view; they do not repair them.
Measure the actual joist spacing, bay width, span, beam locations, obstructions, and available headroom. A product made for one framing layout may need accessories or may not fit another. The system must retain enough pitch to move water while preserving comfortable clearance below. At the house, flashing and the ledger area need a deliberate transition so water does not run behind the ceiling or toward the wall.
Also decide how the system will be maintained. Leaves, pollen, shingle granules, and other debris can reach deck gaps and outlets. The design should provide a practical way to inspect and clear collection points without dismantling the entire finished patio. If wiring, lights, speakers, or a fan will occupy the ceiling zone, map those items before panels close the framing.
- Document the deck structure and condition before any ceiling hides it.
- Confirm product compatibility with joist spacing, beams, run length, and available pitch.
- Preserve access to structural connections, drains, and serviceable equipment.
- Resolve leaks at the house connection instead of directing them behind a finished ceiling.
Plan the patio below as part of the drainage design
Start with the use of the lower patio. A seating area needs comfortable headroom, dry walking paths, sensible lighting, and outlets positioned for the real exposure. An outdoor kitchen adds appliance clearances, ventilation, utilities, grease management, and service access. Storage needs honest limits: an open-sided patio is still exposed to humidity, wind, pests, and temperature swings even when rain from above is controlled.
Place the gutter and downspouts before deciding where furniture, doors, stairs, screens, or cabinets will go. An outlet beside the main walkway can create splash or ice during cold weather. One beside the foundation can send water back toward the house. A concealed downspout may look clean but should not become impossible to inspect or disconnect for maintenance.
Lighting and fans need mounting details that do not puncture drainage components or conflict with the required slope. Electrical work should suit the outdoor location and remain serviceable. If screens or an enclosure may be added later, plan the perimeter, drainage, thresholds, and structural loads now; a water-managed ceiling does not automatically make the deck suitable as the roof of a future room.
- Draw ceiling panels, gutters, downspouts, lights, fans, posts, doors, and furniture on one plan.
- Keep the main walking route clear of concentrated discharge and splash.
- Use equipment and wiring suitable for the actual outdoor exposure.
- Do not describe the lower area as conditioned or fully waterproof unless the complete enclosure is designed for that use.
What should Greater Charlotte homeowners confirm before work begins?
Permit and review needs depend on the property and scope. Mecklenburg County lists adding, replacing, or upgrading a deck among projects that typically require a permit, and structural or electrical work can trigger review regardless of the drainage-product choice. The City of Charlotte currently lists decks among individual residential lot projects reviewed for applicable drainage, urban forestry, and zoning requirements.
That does not mean every under-deck panel replacement follows the same path. A new deck, structural repair, resurfacing project, ceiling with electrical fixtures, enclosed room, and simple compatible retrofit can involve different work. Confirm the current requirements for the exact address and complete scope before materials are ordered.
The final plan should show where collected roof water goes. Charlotte's residential review information notes that stormwater staff may review work affecting drainage features, public storm systems, easements, known drainage issues, and adjacent-property flooding. Do not connect a private downspout to a drainage system, build within an easement, or redirect water toward a neighbor without project-specific confirmation.
- Record the deck dimensions, framing, house connection, grade, and existing drainage features.
- Select the drainage category and exact product before detailing the finished ceiling.
- Show every gutter, downspout, and discharge point on the site plan.
- Coordinate structural repairs, electrical work, screens, and future enclosure plans.
- Verify current jurisdiction, permit, HOA, easement, and inspection requirements for the address.
Plan the deck and dry space below together
Request a Greater Charlotte deck consultation with Unique Patio Concepts to coordinate the framing, drainage, finished ceiling, lighting, and intended use before construction.
Request a free estimateFrequently asked questions
Can you add under-deck drainage to an existing deck?
Often, yes. A below-joist system may fit beneath an existing deck without removing the boards, while an above-joist system generally requires access from the top. The deck condition, joist spacing, beams, headroom, house connection, drainage route, and selected product instructions determine what is practical.
Does an under-deck ceiling protect the deck framing?
Not always. An above-joist system intercepts water before it repeatedly wets the top of the joists. A below-joist system collects water after it passes around the framing, so the wood above still needs ventilation, inspection, and sound flashing and drainage details.
Will the patio under a deck be completely waterproof?
No open-sided under-deck patio should be promised as completely waterproof. A properly installed system can control water passing through the deck, but wind-driven rain, condensation, ground water, overflowing gutters, stairs, and open edges can still introduce moisture.
Can you install lights or a ceiling fan below the deck?
Often, yes, when the drainage system provides compatible mounting and service details and the electrical equipment suits the outdoor exposure. Plan wiring, supports, panel slope, penetrations, clearances, and controls before the ceiling is installed.
Where should under-deck downspouts drain?
They should discharge to a suitable approved location that carries water away from the house, doors, footings, walkways, and neighboring property without creating erosion or a slipping hazard. The correct outlet depends on grade, soil, existing drainage, easements, and local requirements.
Does an under-deck drainage project need a permit in Charlotte?
It depends on the complete scope. A new or modified deck, structural repair, electrical work, enclosure, and changes affecting site drainage can require permits or review. Confirm the current process for the exact address with the applicable Charlotte, Mecklenburg County, or neighboring jurisdiction before work begins.