
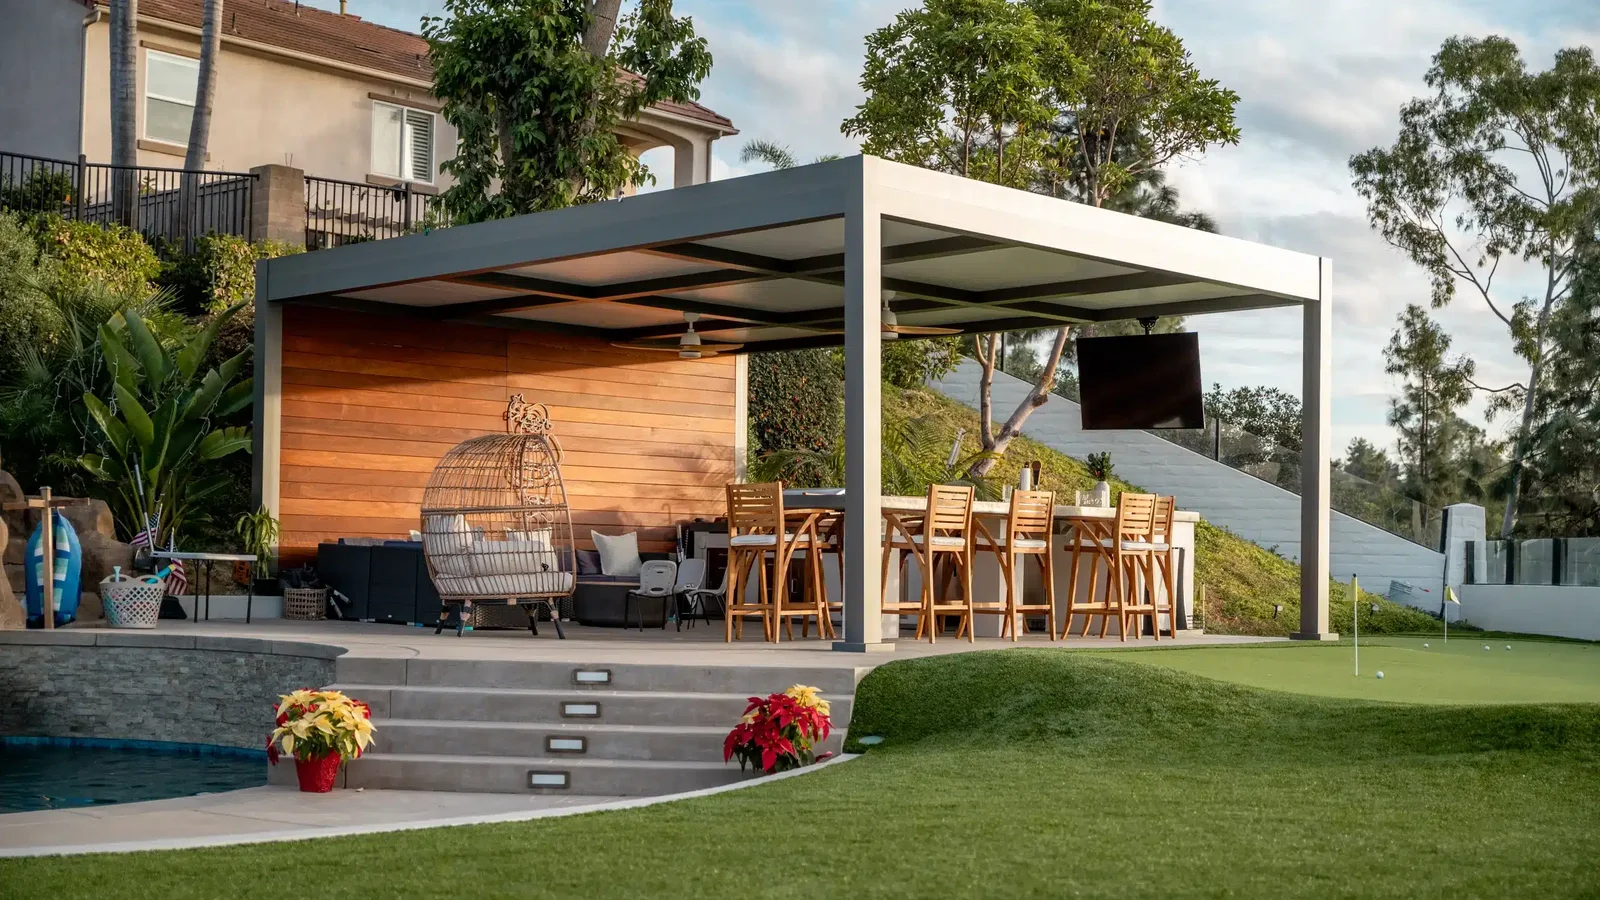
Yes—many insulated solid-roof patio covers can include an outdoor ceiling fan, but the fan should be part of the structural and electrical plan rather than attached wherever there appears to be an open roof panel. The cover needs a manufacturer-approved beam, bracket, or other mounting location that carries the fan's weight and operating movement without damaging the insulated roof. The selected fan must suit the outdoor exposure, fit the available ceiling height, maintain the clearances required by its instructions, and connect to properly planned outdoor electrical service and controls. Azenco currently lists fans as an integrated option for its R-SHADE fixed insulated patio cover. For a new Charlotte-area project, choose the fan and location before engineering and ordering the cover. For an existing cover, identify the exact product and approved mounting details before drilling or running wire.
Start With an Approved Fan Support, Not an Empty Ceiling Spot
A ceiling fan is a moving load. Its weight matters, but so do motor vibration, blade rotation, wind, and the leverage created by a downrod. The attachment should transfer those forces into a structural part of the patio cover that the manufacturer or project engineer has approved for the purpose. The thin visible face of an insulated panel is not automatically that support.
Azenco describes its R-SHADE as a fixed-roof aluminum patio cover with insulated sandwich panels and lists ceiling fans among the available integrated features. Azenco's fan guidance also emphasizes a built-in fan beam that supports the fan and conceals wiring. That is useful product-specific direction, not permission to improvise the same detail on every aluminum cover. Other systems may use a different beam, bracket, reinforcement, mounting box, or accessory kit.
On a new cover, place the fan on the drawings before the structural layout is finalized. The beam grid can then support the intended location while wiring remains concealed and serviceable. On an existing cover, identify the manufacturer, model, panel layout, framing, engineering documents, and any approved fan accessory before making holes. If the system cannot provide a documented load path, a freestanding fan or another comfort strategy may be safer than modifying the roof.
- Record the exact fan model, weight, downrod, control equipment, and light kit if used.
- Locate the structural beam or approved accessory that will carry the fan.
- Confirm how wiring reaches the mounting point without creating a roof leak or exposed splice.
- Preserve gutter, drainage, insulated-panel joints, fasteners, and required service access.
- Keep product documentation and approved mounting details with the project records.
Why a Fixed Insulated Roof Is Different From an Operable Louvered Roof
A fixed insulated patio cover gives a fan a predictable ceiling plane. The roof panels do not rotate through the fan's space, and a planned structural beam can remain in one position. That makes a fan a natural option when the cover system specifically supports it.
An operable louvered pergola has a different geometry. Blades rotate, water moves through dedicated channels, and motors, linkages, and divided roof zones occupy space above. A fan may still be possible on some engineered louvered systems, but it typically needs a fixed fan beam or another approved zone that remains clear of the moving roof. A downrod should never be placed through the travel path of louvers simply because the pergola is open when measured.
This distinction matters when comparing products. If a ceiling fan is a priority, include it in the choice between a fixed insulated cover and an adjustable louvered roof. Do not select the roof first and assume the same mounting detail can be added later. The support, wiring path, drainage, roof movement, and visual alignment all depend on the exact system.
Choose the Fan by Exposure, Size, and Clearance
A roof overhead does not automatically make a patio a dry indoor location. Wind-driven rain, humidity, condensation, cleaning water, and open sides can expose a fan and its controls to moisture. Azenco recommends a wet-rated outdoor fan for pergola use. The fan manufacturer's listing and installation instructions should govern the exact location; do not assume an indoor fan is acceptable because it sits several feet inside the roof edge.
Fan diameter should fit the usable zone rather than the roof dimensions alone. Measure from the blade tips to posts, beams, walls, screens, cabinets, heaters, lights, speakers, TVs, and anything that can swing or open. Include motorized-screen housings and tracks even if screens will be added later. A fan centered in the full cover may be off-center from the actual seating area, while a fan centered over a dining table may conflict with a light or heater.
Ceiling height and downrod length determine whether air movement reaches people without placing blades uncomfortably low. Use the fan manufacturer's required mounting height and clearances, then test those dimensions against the finished patio floor, any sloped grade or steps, furniture, and the cover's beams. Do not shorten a downrod, change a mounting angle, or use a flush mount unless the exact fan allows it.
- Match the fan's outdoor listing to the actual exposure, not the marketing name of the room.
- Measure blade-tip clearance from every fixed and moving feature.
- Use finished floor and final ceiling elevations rather than rough patio measurements.
- Coordinate fan diameter, downrod, light kit, beam depth, and furniture on one reflected-ceiling plan.
- Keep the fan reachable for safe cleaning and service without climbing onto the roof.
Place the Fan Where People Need Airflow
A fan does not lower the outdoor air temperature. It improves comfort by moving air across occupants, so placement should follow the seating and activity zones. Mark the dining table, lounge seating, cooking area, doors, and main walkway before choosing the center point. A fan over unused circulation space may look symmetrical while doing little for the people under the cover.
One larger fan can suit a compact seating zone, while a long or divided patio may work better with two smaller fans aligned to the structural bays. The answer depends on fan performance, roof height, furniture, obstructions, and the cover's approved mounting locations. Avoid choosing fan count from square footage alone.
Think about adjacent equipment. Smoke and heat from a grill should not be driven toward the house, guests, or a low roof cavity. A fan and patio heater need compatible spacing and manufacturer-approved locations. Retractable screens change airflow and exposure when lowered. A television, pendant light, or speaker may sit within the moving air and should not create glare, flicker, vibration, or a crowded ceiling. Plan those accessories as one system rather than filling the ceiling one item at a time.
Plan Power, Controls, and Lighting Before Installation
A ceiling fan requires more than a cable that reaches the beam. The electrical plan should identify the circuit, outdoor-rated wiring method and equipment, fan-rated mounting hardware, switching, remote receiver, light kit, grounding, weather protection, and a serviceable path through the patio-cover system. A qualified installer should follow the fan instructions, patio-cover documents, and requirements for the address.
Decide how the fan will be controlled from the places people actually enter the patio. A wall control near the house door may be more dependable than relying only on a handheld remote. If smart control is desired, confirm that the selected fan, receiver, and home system are compatible and that the receiver remains accessible. Do not bury replaceable controls inside an insulated panel or inaccessible beam cavity.
Coordinate the fan with recessed lights before either is placed. Blades passing close to a point light can create a distracting strobe or moving shadow. Spacing lights outside the blade sweep, using compatible dimming, and aligning fixtures with the beam grid generally produces a cleaner ceiling. If the fan includes a light, confirm that its output and beam spread suit the seating area instead of assuming it replaces all patio lighting.
- Show fan, light, heater, screen, receptacle, and control loads on the electrical plan.
- Keep junctions, receivers, disconnects, and service parts accessible as required.
- Protect penetrations and wiring routes without interrupting roof drainage or panel performance.
- Test control locations from the house door and primary outdoor seating zone.
- Confirm structural and electrical approvals before the cover is closed or finishes are installed.
Can a Fan Be Added to an Existing Insulated Patio Cover?
Sometimes, but the existing cover needs to be identified first. Find the manufacturer and model, installation drawings, panel direction, beam layout, attachment type, electrical provisions, and any approved fan kit. Photographs of the underside do not prove what is inside a beam or whether the visible panel can carry a moving load.
A retrofit may require an approved structural cross-member, surface raceway, new circuit, access panel, or a different fan location. It may also reveal conflicts with gutters, roof-panel seams, house flashing, recessed lights, screens, heaters, or low clearances. Those limits should be understood before purchasing a fan.
Do not drill through an insulated sandwich panel to search for framing, hang a fan from panel skin, or use a generic interior ceiling box without confirming compatibility. An unplanned penetration can damage insulation, create a leak path, interfere with drainage, or weaken the attachment. If documentation is unavailable, have the cover and proposed mounting method evaluated rather than relying on a visual guess.
What Should Greater Charlotte Homeowners Confirm?
Prepare one plan that shows the patio cover, posts, beams, roof panels, house attachment or freestanding supports, gutters, electrical route, fan mounting point, blade circle, finished floor, furniture, lights, heaters, screens, grill, doors, and walking paths. A reflected-ceiling view is especially useful because it exposes conflicts that a top-down site plan can miss.
Mecklenburg County states that permits are required for residential work involving structural additions or changes to electrical systems, among other scopes, and that separate building and electrical permits may apply. The review path depends on the complete project. Nearby municipalities, Union County communities, and South Carolina jurisdictions use their own processes, so confirm current requirements for the exact address and scope before ordering or modifying the cover.
Unique Patio Concepts can help plan an Azenco R-SHADE insulated patio cover, its structural bays, fan-ready location, lighting, screens, drainage, and furniture layout as one outdoor room. The useful question is not simply whether a fan fits beneath the roof. It is whether the selected fan, mounting detail, electrical plan, and everyday patio layout work together without compromising the cover.
- Select the fan early enough to include its weight, diameter, downrod, controls, and light kit in the design.
- Confirm the exact approved mounting support and concealed or protected wiring route.
- Check finished clearances with all accessories and furniture shown.
- Verify outdoor rating, electrical installation instructions, and service access.
- Confirm address-specific zoning, HOA, building, and electrical requirements before work begins.
Plan the fan and patio cover together
Request a Greater Charlotte outdoor-living consultation from Unique Patio Concepts to coordinate an insulated patio cover, fan-ready support, lighting, screens, drainage, and furniture layout.
Request a free estimateFrequently asked questions
Can you install a ceiling fan under a solid-roof patio cover?
Yes, when the patio-cover system provides an approved structural mounting point, the fan is rated for the exposure, required clearances are maintained, and the electrical installation is properly planned. Azenco currently lists ceiling fans as an integrated option for its R-SHADE insulated fixed-roof patio cover.
Does a covered patio need a wet-rated ceiling fan?
The rating should match the real exposure and the fan manufacturer's instructions. An open-sided cover can still receive humidity and wind-driven rain. Azenco recommends wet-rated outdoor fans for pergola applications, making that a practical starting point for many exposed patio covers.
Can a fan be mounted directly through an insulated roof panel?
Do not assume so. The visible panel skin is not automatically a structural fan support, and an arbitrary penetration can affect insulation, drainage, and weather resistance. Use a manufacturer-approved beam, bracket, box, or accessory detail for the exact cover.
How high should a patio-cover ceiling fan be?
There is no single height for every project. Follow the exact fan's mounting-height and clearance instructions, then coordinate its blades and downrod with the finished floor, beams, posts, screens, lights, heaters, furniture, and local requirements.
Will a ceiling fan make a covered patio cooler?
A fan does not reduce the outdoor air temperature, but moving air across occupants can improve comfort. The result depends on fan performance, ceiling height, placement, obstructions, open sides, screens, humidity, and where people sit.
Does a patio-cover ceiling fan need a permit in Charlotte?
It may. A new patio cover can involve structural review, and adding or changing electrical service can require a separate electrical permit. Requirements depend on the address and complete scope, so confirm the current process with the applicable authority before installation.