
Yes. Many insulated aluminum patio covers can include recessed LED lights, but the lights should be designed into the roof system rather than added by drilling wherever a fixture looks convenient. The patio-cover manufacturer or installer needs to identify approved fixture zones, mounting details, wire paths, access points, and penetrations that preserve the panels, structure, finish, seals, and drainage. The electrical plan also needs fixtures and controls suited to the actual outdoor exposure. Decide where dining, cooking, seating, doors, steps, and walkways will be before placing the lights; a smaller number of well-positioned, dimmable fixtures usually creates a more useful patio than a bright grid that causes glare.
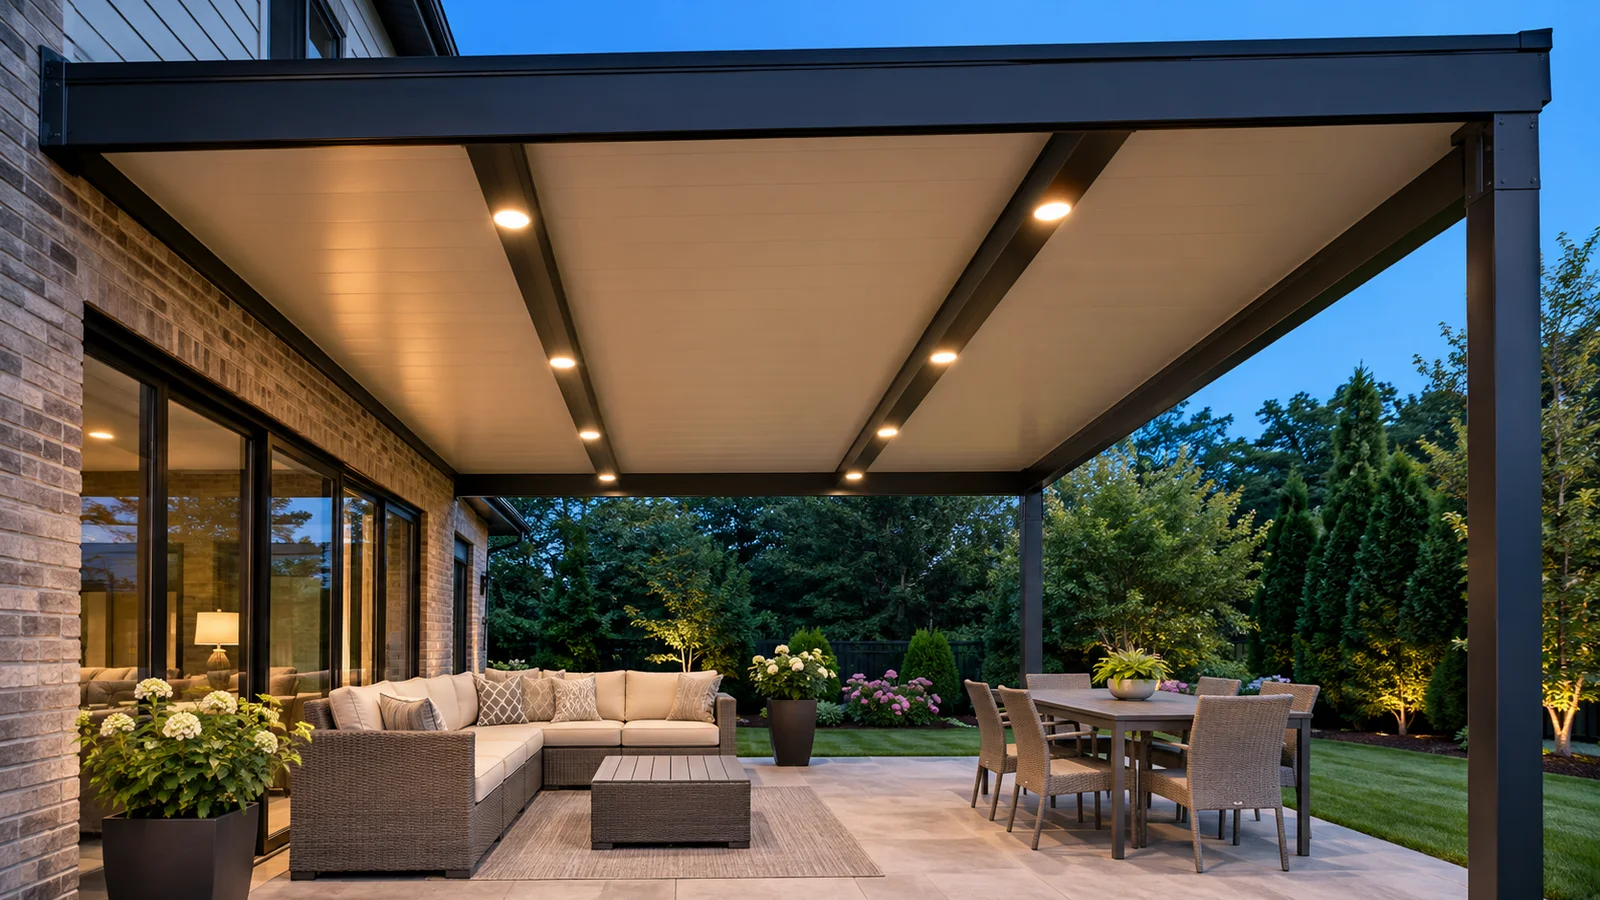
Plan the lights before the patio cover is installed
An insulated patio cover is a coordinated roof assembly, not a conventional drywall ceiling with an open attic above it. The visible underside may be part of a factory-made panel system, while beams, channels, seals, gutters, and concealed wire paths handle structure and weather. A light location that appears clear from below may intersect a panel joint, structural member, drainage path, or area that should remain sealed.
The cleanest approach is to include lighting in the patio-cover design. Mark the fixture type, diameter, trim color, beam or panel location, wire route, driver location, switching, and future service access before fabrication. Azenco currently lists integrated recessed lighting as an available option for its R-SHADE insulated patio cover and describes recessed LEDs as an integrated lighting choice for its aluminum outdoor structures. That product availability supports early coordination; it is not permission to improvise the same opening in every patio-cover brand or panel.
Early planning also keeps surface-mounted conduit and after-the-fact patches from becoming the visual focus. When the roof system has an approved lighting detail, the installer and electrician can coordinate responsibilities instead of discovering conflicts after the finished panels are overhead.
- Select the exact patio-cover system before finalizing the fixture detail.
- Place lights on the roof and electrical plans, not only on a furniture sketch.
- Confirm which members or channels can carry fixtures and wiring.
- Preserve panel joints, gutters, seals, insulation, and required service access.
Place light where the patio needs it
Start with activities rather than an evenly spaced ceiling grid. A dining table benefits from comfortable light centered on the usable table area. An outdoor kitchen or serving counter needs more focused task light without putting the cook's head between the fixture and the work surface. Doors, steps, and changes in elevation need enough illumination to be easy to see, while lounge seating usually feels better with softer ambient light.
Draw the patio at night-use scale and mark furniture, door swings, fans, heaters, screens, speakers, posts, and the main route between the house and yard. Then place lighting around those zones. This prevents a recessed light from landing directly above a fan blade, behind a dropped screen housing, or in a position that shines into the house through a large glass door.
The structure may limit the ideal visual spacing. If approved fixture locations are available only in selected beams or channels, use those constraints to build a deliberate pattern. A balanced row over the dining area and a separate row along the walking path can look more intentional than forcing a perfect grid across unrelated roof bays.
- Center useful light on dining, prep, and circulation zones.
- Keep fixtures clear of fans, heaters, screens, speakers, and roof accessories.
- Check the view from inside the house so bright downlights do not become nighttime glare in the glass.
- Show future furniture and accessory plans before locking the fixture locations.
Match the electrical system to outdoor exposure
A roof overhead does not automatically make every fixture location a dry indoor location. Wind-driven rain, condensation, humidity, temperature swings, insects, and cleaning can still affect the lights and electrical components. The fixture, trim, box or mounting assembly, driver, connectors, wiring method, controls, and penetrations should all suit the specific exposure and installation instructions.
Coordinate the electrical work with the roof installer. The electrician should know where wiring may pass, where connections remain accessible, and which openings the patio-cover manufacturer allows. The patio-cover team should not conceal connections or drill new paths without the electrical and product details being resolved. Local permits and inspection requirements can vary by address and scope across Greater Charlotte, so confirm the current process before the ceiling is closed.
Plan how the lights will be controlled. A switch at the primary exterior door is convenient for everyday use. Dimmers can move the same patio from cleanup brightness to softer evening light, while separate zones keep task lighting from forcing every fixture to full output. Smart controls may be useful, but ordinary wall control and a serviceable manual fallback still matter.
- Use listed equipment suitable for the actual damp or wet exposure identified by the project team.
- Keep drivers, connections, and controls accessible as required by their instructions.
- Coordinate circuits and controls with fans, heaters, screens, and outdoor-kitchen equipment.
- Have qualified electrical work permitted and inspected where the local authority requires it.
Choose brightness and color for comfort, not maximum output
Outdoor patios are surrounded by darkness, so a fixture that feels moderate in a showroom can look harsh at night. More lumens are not always better. Bright points reflected in windows, polished counters, or a television can make the space less comfortable even when the floor is well lit. Use the fixture's beam pattern and trim to put light where it is needed, and use dimming to handle different activities.
Warm white light usually feels natural beside brick, wood-grain ceilings, landscaping, and residential interiors. The exact color temperature should coordinate with nearby exterior sconces and the rooms visible through the doors. Mixing very cool recessed lights with warm house lighting can make the patio feel disconnected. High-quality color rendering is also useful around food, finishes, and landscaping.
Mock up at least one fixture or review a real nighttime sample when possible. Product photos can show the appearance of a lit structure, but they do not reveal how a specific beam angle, ceiling height, finish color, and furniture layout will feel in your backyard.
- Prefer dimmable lighting when compatible fixtures, drivers, and controls are available.
- Coordinate color temperature with nearby exterior and interior lights.
- Use narrower task light only where the work surface needs it.
- Check glare from seats, the dining table, glass doors, and neighboring sightlines.
Can recessed lights be added to an existing insulated cover?
Sometimes, but the answer depends on the exact cover. First identify the manufacturer, model, panel profile, beam layout, wiring provisions, and any approved retrofit details. Photographs of the top and underside are helpful, but they may not reveal concealed structure, insulation, drainage, or existing electrical paths. Product documents or installer records are more useful than guessing from appearance.
Do not treat the underside as a blank ceiling. Cutting through a panel can expose insulation, damage a weather barrier, create a leak path, weaken a component, or leave no approved way to support the fixture. Drilling through a powder-coated beam can damage the finish and may conflict with the product's structural or corrosion-protection requirements. Surface-mounted lighting in an approved location may be the cleaner retrofit when recessed openings are not supported.
A retrofit plan should also explain how wiring reaches each fixture without loose cords, inaccessible splices, or an improvised path through drainage channels. If the product cannot be positively identified or the manufacturer has no suitable detail, pause before cutting and compare non-invasive lighting options instead.
- Find the original patio-cover plans, product label, installer, or manufacturer documentation.
- Inspect accessible structure and existing electrical routes before selecting fixtures.
- Require an approved support and weather-sealing detail for every new opening.
- Consider surface-mounted or beam-integrated alternatives when recessed work is not supported.
A Greater Charlotte patio-cover lighting checklist
Bring the roof plan, furniture plan, and electrical plan together before ordering the structure. Mark where people will sit, cook, enter, walk, and look out from the house. Add every fan, heater, screen, speaker, and future accessory, then identify the approved lighting zones in the selected patio-cover system.
For each light, record its purpose, fixture and trim, outdoor rating, beam pattern, color temperature, dimming compatibility, mounting detail, wire route, control zone, and service access. Confirm the patio-cover manufacturer's current instructions and the fixture manufacturer's installation requirements rather than relying on a generic detail from another system.
Unique Patio Concepts can help Greater Charlotte homeowners plan an insulated patio cover and its comfort features as one project. The goal is not to fill every roof bay with lights. It is to create useful evening illumination while keeping the roof assembly clean, weather-managed, and serviceable.
- What activity does each fixture support?
- Is the proposed fixture location approved for the exact roof system?
- How will wiring reach the light without disturbing structure or drainage?
- Are fixtures and electrical components suited to the real exposure?
- Which lights should dim or switch independently?
- Can every driver, connection, and control be serviced later?
Plan the patio cover and lighting together
Request a Greater Charlotte outdoor-living consultation with Unique Patio Concepts to coordinate the insulated roof, recessed lighting, controls, furniture zones, and future accessories before installation.
Request a free estimateFrequently asked questions
Can recessed lights go directly into insulated roof panels?
Only when the exact patio-cover system provides an approved fixture location and installation detail for that panel or an integrated beam. Do not cut a generic opening through an insulated panel without confirming support, clearance, sealing, wiring, and product requirements.
Does an Azenco R-SHADE patio cover support recessed lighting?
Azenco currently lists integrated recessed lighting as an available R-SHADE option. The layout and installation still need to follow the current R-SHADE design, dealer guidance, electrical plan, and project-specific requirements.
How many recessed lights does a covered patio need?
There is no useful universal count. Patio size, ceiling height, fixture output and beam angle, finish colors, furniture, task areas, and desired brightness all matter. Lay out lights by dining, cooking, seating, door, step, and walkway needs, then confirm performance with the selected fixture data.
Should patio-cover lights be dimmable?
Dimming is usually valuable because a patio needs more light for cooking or cleanup than for quiet seating. The fixtures, drivers, dimmer, controls, and wiring must be mutually compatible and suitable for the installation.
What color temperature is best under a patio cover?
Warm white light commonly fits residential patios and coordinates well with brick, wood tones, landscaping, and interior rooms. Compare the exact fixture with nearby exterior lights and visible indoor lighting before choosing; consistency is often more important than one universal number.
Can lights be added after an insulated patio cover is built?
Sometimes. Identify the product and approved retrofit paths first. If recessed openings or concealed wiring cannot be added without affecting panels, beams, finishes, seals, or drainage, an approved surface-mounted or beam-mounted lighting option may be safer and cleaner.